EEPDF Picture to PDF Converter helps you convert image to PDF helps you convert image to PDF with different properties. And this page is for showing you how EEPDF Picture to PDF Converter works in different functions on computers of Windows systems.
 How about a free trial or a convenient purchase right now?
Free ![]() Download Purchase
Download Purchase ![]() Online
Online
General steps to convert image to PDF
After you double click on shortcut of EEPDF Picture to PDF Converter on your computer, you can get its GUI interface popping out, then to convert picture to PDF with GUI interface, please read the following paragraphs:
![]() Add image files
Add image files
Click Add File(s) on GUI interface or click File > select Add Files, then in pop dialog box, please choose image files > click Open there, so by now, it is finished to add source image files.

However, you also could add dozens of image files in form of path: click File > select Add directory > choose one folder in pop dialog box Browse for folder with one click on OK, then all image files in chosen folder could be added in processing form of GUI interface directly.
To preview added image files, please click their paths shown in processing form directly and separately.
![]() Setting PDF properties in different aspects
Setting PDF properties in different aspects
EEPDF Picture to PDF Converter supports editing PDF properties in different aspects. Here are relative tips below:
- Select proper output way
According to different input ways, EEPDF Picture to PDF Converter was designed for compatible output ways:
To produce single PDF file from dozens of image files, please click tab Save Mode, then click radio Combine image files into one PDF file; to generate multiple PDF files from multiple image files, please click radio Convert multiple imge files to multiple PDF files; to produce multiple PDF files based on some directories, please click radio Convert multiple directories to multiple PDF files.
There are 3 ways to set PDF save mode which are always asking for filename, saving to original directories with corresponding filename and saving to following directory or filename with specified path, and you can click on related radio and edit box in order to set them separately.

On condition of existed PDF file, to produce PDF file with same filename, overwriting it, inserting it or appending it could be selected with relative radio chosen.
- Edit output visual effect
After you click tab Base Setting, to correct skew and get rid of speckle, please click check boxes of Skew Correct and Despeckle. Even if you want to set resolution of PDF, EEPDF Picture to PDF Converter could help you with that, too: please type DPI in edit box of PDF DPI Setting or click one option on its own dropdown list. Besides that, this application lets you recognize black and white images, all you need to do is to click check box Auto recognize Black and White images. Of course, to preview PDF files after processes from picture to PDF, please click check box View after conversion.

- Customize PDF information
To edit PDF information, please click tab PDF Info, then type customized information in edit boxes Title, Subject, Author and Keywords like below.

- Set PDF bookmarks
When you want to insert bookmarks in PDF files, EEPDF Picture to PDF Converter still could support this without letting you disappointed. Please click tab Bookmarks > select check box Use Bookmarks, and click one of radios Use page numbers as bookmarks, Use the short filename as bookmarks and Use the full filename as Bookmarks, so different style bookmarks could be made successfully.

- Select suitable encrypted mode
EEPDF Picture to PDF Converter also supports encryption modes. You can click tab Encrypt Options, then click check box Encrypt PDF File, and after the followings under Encrypt PDF File are activated, you could customize user password and owner password, select encryption level and even set permission for owner password:
You can type passwords of user and owner in related edit boxes User Password and Owner Password; to encrypt PDF files 40 bits or 128 bits RC4, which are popular encryption modes, please click their radios accordingly and separately; to edit permission of owner password, please accordingly click check boxes No Printing, No Changing the document, No Content copying or extraction, No Adding or Changing form field.

Finally, when all the setting with Setting panel is finished, please click OK there so that these settings could be saved automatically.
![]() Start to convert image to PDF
Start to convert image to PDF
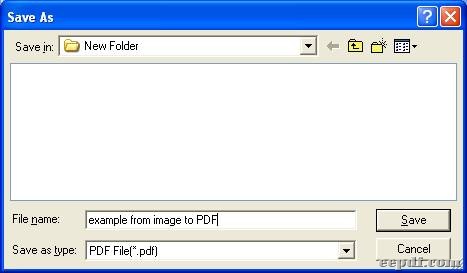
After all basic work is done successfully and properly like above, please click Make PDF on GUI interface of EEPDF Picture to PDF Converter, then select Convert all images files with default options > select one folder in pop dialog box save as > click save there, then EEPDF Picture to PDF Converter could help you convert picture to PDF automatically and quickly, then after a while, PDF files could be generated from added images into targeting folder chosen just now.

Another convenient way to convert picture to PDF in manner of backup files
If you want to convert image to PDF with more easier way and more fast speed in EEPDF Picture to PDF Converter, please read the following part:
Click File > select Monitor A Special Directory on dropdown list, then a smaller interface named PDF E-Book Maker is opened on your screen
Please click Add on this interface, and in pop setting dialog box, please input source path of disk or folder including multiple image files in edit box monitor directory, and type targeting path of one folder or one disk in edit box PDF output directory, then monitor path and output path can display in processing form automatically

To modify source directory and output directory, please click Modify on interface > change directories in edit boxes on panel Setting > click OK

To remove source image files after process from picture to PDF, please click check box Delete original image file(s) after conversion
Finally, to start conversion from image to PDF, please click OK, then, later on, source image files in monitor directory and produced files in output directory could be processed to BAK files. So if you want to get back source images, you can change file extension to source file extension; to obtain PDF files, please change their file extension to “.pdf” directly, which is very easy to handle for any users
A convenient way to set options for scanner
EEPDF Picture to PDF Converter supports editing properties for output scanner. You can click File > select Set scanner options on dropdown list, then its panel named scan options could be popped out, where you can select different mode of quality and file size etc.:

There are 4 patterns of quality and small size, and you can set them separately by clicking their radios separately. Especially, after you click radio Custom, there could be a panel named Custom scan settings popping out. Then, you can customize proper one according to different tabs on this panel.
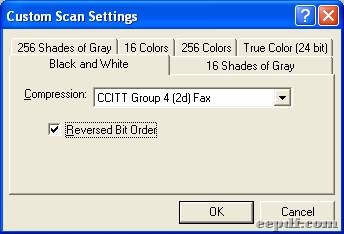
Click Black and White tab > select compression mode on dropdown list, then output file could be monochrome with selected compression mode
Click 16 Shades of Gray tab > select one compression mode on dropdown list, so shade of gray could be set in output files

Click 256 Shades of Gray > select one compression mode, for instance, JPEG, then JPEG resolution and quality could be set conveniently

Click tab 16 Colors > select one compression mode, so targeting files could be customized on 16 colors with or without LZW compression

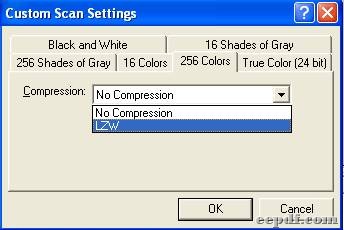
Click tab 256 Colors > select one option on dropdown list, then output files could be edited with or without LZW compression mode
Click True Color 24 bit tab > click JPEG, LZW OR No Compression, then JPEG resolution and quality could be adjusted professionally with selected compression mode JPEG, or output files could be compressed with LZW or no compression

When you finish the selection on custom scan settings panel, please click OK so that it could be saved and this panel could be closed.
When you go back to scan option panel, to set transfer mode, please click Advanced > select one of radios Native and Memory > click OK.

Useful related links
After you know how EEPDF Picture to PDF Converter work on Windows platforms, you can also:
- Go back to what is EEPDF Picture to PDF Converter
- Go to Other products entrance or visit eepdf.com official website