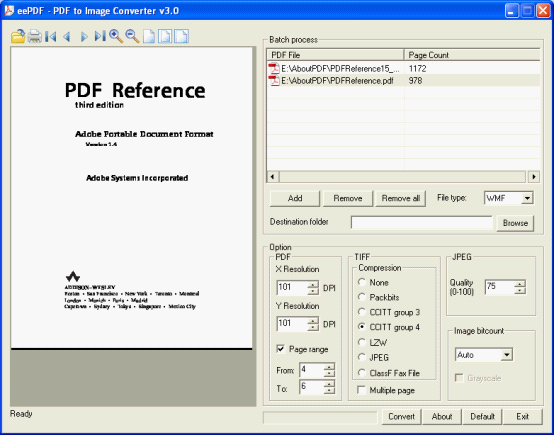
Set the image of quality in converting PDF to imageFig.1 is a screen snapshot of the main window of PDF to Image Converter. In top right corner of the window, it is a table of file list listing the pdf files for batch converting. The button of [Add] below the file list is for adding files to the file list, and buttons of [Remove] and [Remove all] are for removing files from the file list. You can select a format of image in the dropdown list of “File type”. The input box and the button of [Browse] are for setting the destination folder to save the converted images. On the left, it’s a form for previewing the selected pdf file in the file list. There is a toolbar on the preview form for viewing the pdf pages.
In the lower right part of the main window, there are several group boxes of conversion option. In group box of “PDF”, you can set the resolution for conversion. PDF pages of specified range of pdf number with checking the box of “Page range” in the “PDF” group box. In the group box of “TIFF”, you can select a compression method for converting pdf to tif image. Supported compression methods are Packbits, CCITT group 3/4, LZW, JPEG, and ClassF Fax File. Check the box of “Multiple page” for converting a multipage pdf file to a multipage TIF image. In group box of “Image bit count”, you can set the color depth to 1, 4, 8 or 24 bit. In the group box of “JPEG”, you can set the compression ratio for converting pdf to jpg. Press the button of [Convert] in the bottom of the main window to start the conversion after setting all parameters. |
Product
A Great Software!
User Comments
![]()
EEPDF PDF to Word OCR Converter is so powerful! It might be the most convenient professional PDF to Word converter I’ve ever used. Compared with other software, it is simpler and more easy-to-use. Most importantly, I can always use this tool to convert PDF to Word as I want. I really like it, especially when I have to convert large scanned PDF to Word.。。
![]()
Follow eePDF