With the help of EEPDF Office to PDF Converter, you can customize viewer preferences when converting image/Office to PDF.
EEPDF Office to PDF Converter is a professional PDF creator that can convert Office Word, Excel,PowerPoint, etc. to PDF. It also enables users to convert JPG, JPEG, BMP, PNG, GIF, TIF, TIFF, PCX, TGA, etc. image to PDF. Also, it works well in setting viewer preferences during the creation of PDF documents.
Just by following the steps below, you can successfully convert image/Office documents to PDF and set the viewer preferences.
Step 1. Download and install
Please download the installer of EEPDF Office to PDF Converter at first. After the download, please double click the installer and follow the setup wizard to install it on the computer. For your handy use, please create a shortcut icon on the desktop during the installation.
Step 2. Add image/Office documents
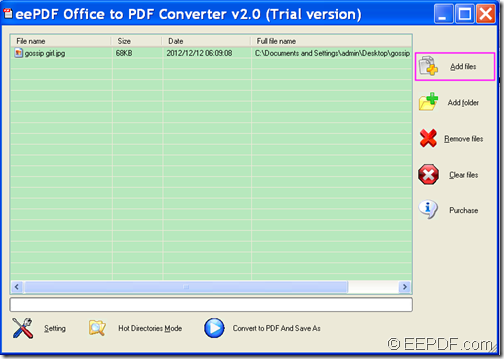
This PDF creator supplies several methods to add input image/Office documents. You can directly drag and drop the files to the application or click Add files button on the right side of the main interface to open file picker window in which you can choose file. (In this case, we add a JPG image.) Please see next snapshot.
Step 3. Set viewer preferences
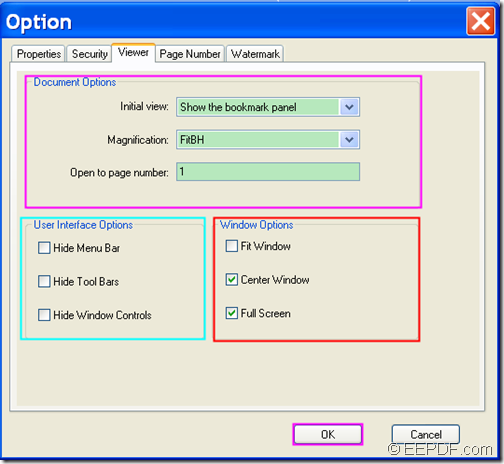
To set the viewer preferences, please click Setting button at bottom of the main interface to open the “Option” setting interface. Then, please click the Viewer tab to switch to the “Viewer”panel.
- In the drop-down list of “Initial view”, you can choose to whether to show bookmark and thumbnail panel.
- In the drop-down list of “Magnification”, you are able to set the magnification.
- In “Open to page number” edit box, you can set the firstly displayed page.
- In “User Interface Options”group box, you can choose to whether to hide menu bar, tool bars and Window controls.
- In “Window Option” group box, you can set the size of the viewing window.
After the settings, please click OK button to apply the settings. Please see it in following snapshot.
Step 4. Convert
Please click the Convert to PDF And Save As button at bottom of the main interface. In the pop-up “Browse for Folder” window, please choose a folder for the created PDF and click the OK button to start the conversion.
In the following two snapshots, you can see the original JPG image and the created PDF file.
This is the end of this article and you can enjoy full version of EEPDF Office to PDF Converter here.


